How to Make Your Own Manifold Edition
A Guide for the Technophobe
This guide will take you through the steps to creating your very own OER on Manifold. You have done the hard work of deciding which texts to use, making sure your material is licensed for reuse and remix, and now you want to bind it all in a digital book your students can all use on their laptops and mobile devices.
Step 1
Create your Manifold Account on CUNY.MANIFOLDAPP.ORG
All you need are:
- Your Email Address
- A Password
OR
Login with Google!
Once you have an account, request PROJECT CREATOR privileges. To make the request, simply fill in this form with your name, email, CUNY affiliation, and brief project description. Once your application has been reviewed, your account will be set to Project Creator status.
Whether a creator or a reader, you can set your avatar, reset your password, and adjust notifications on your personal profile.

Step 2
Once you have permission, log in and click ENTER ADMIN MODE on the top menu. The display will shift color so that you know you’re on the backend. You’ll see a search bar to find existing projects to contribute to and just below that you’ll see the “Add a New Project” button. Go ahead and click.

Now that you have access to Manifold we’re going to set up your material!
Step 3
Add the Title and Subtitle and Description to your project. These fields are yours. You’ll notice a menu of options down the left-hand side of the page -- General, Appearance, Permissions, People, Texts, Resources, Collections, Activity, Metadata, Social Integrations, Log. Don’t worry! You can get your materials up online without having all these categories figured out. As you move forward, you’ll find that you want to adjust things -- and that’s totally ok. If you’re worried that “Author” isn’t immediately apparent, know that you can find it under “People.” Manifold puts authors in the “Creator” category and editors and publishers in “Contributor.” But that can wait.
Once you fill in your title and click “Save and Continue.”
Step 4
Now that you’ve got your Title set up, you get to start adding the real stuff. Now we get into the forking paths a bit. You (or your team) have to determine what your Manifold project is. While Manifold accommodates a lot of different types of projects, it is not an authoring platform; it will make your texts and resources easy to read, annotate, and cite. Much of a project’s success lies in the preparation of the text, so we want to make sure you’re collecting and editing things in a way that will give you your desired results.
For our purposes, this guide will focus on two main types of project.
- A classroom edition of an EPUB from Project Gutenberg or Standard Ebooks. (e.g. Pride and Prejudice)
- A compilation of essays and teaching materials from various contributors writing in Google Docs. (e.g. Structuring Equality, or Teach@CUNY Handbook)
Manifold can ingest (the action that describes uploading a file onto the Manifold platform) EPUBs, markdown, HTML, Google Docs, and Microsoft Word files. All document types are described in our continually updated Manifold Documentation. You can always consult these guides or contact community members on the community Slack channel or tweet us at @manifoldscholar.
Step 5: Ingest your text
A. Select An Existing EPUB
Manifold makes EPUB ingestion insanely easy and fast. Once you have identified the text you wish to make Manifold, download the EPUB to your computer.
B. Go to Texts
From the Project screen in Manifold, select “Texts” and then drag and drop the EPUB from your downloads into the window. (You can also use the “Choose File” option to navigate through your computer’s files to the download).


Your file will become visible within the “UPLOAD A FILE” box on the “ADD A NEW TEXT” blade. When the file is ready, press “CONTINUE”.
C. Press “INGEST”
The window will tell you when Manifold is connecting to the websocket. You can then press “INGEST” and as Manifold processes the text, you should see a step by step log as Manifold performs. Manifold can determine what files you have uploaded (whether EPUB or zipped folder of Markdown or Google Docs, etc.) and will determine the appropriate ingestion strategy.
If all goes well, you should get an “Ingestion Complete” announcement.

You can now preview your text. Because you are using a pre-fab EPUB, there may be formatting issues. Manifold respects the structure given by the EPUB but will not override a poorly designed EPUB. For greater control about how sections are labelled, you can create your own files using Markdown or HTML. Remember, though, that Manifold is designed to be responsive, which means it follows the structure provided (not fixed formatting).
D. Add Information
Your book is already there, but to make sure the citation creator can work you must add a few basic pieces of information.
- Title (already done!)
- Author -- this you will add under “PEOPLE”
- Publication Date -- this is your new edition, per Chicago Manual of Style, so the publication date is the date you decide to make your edition live. Publishers will have their own decisions about these edition dates. You will need to have publication dates marked in both the Project and each individual text.
- Publisher -- this you will add in the ‘TEXT’ under ‘METADATA’

E. Add Cover and Hero Images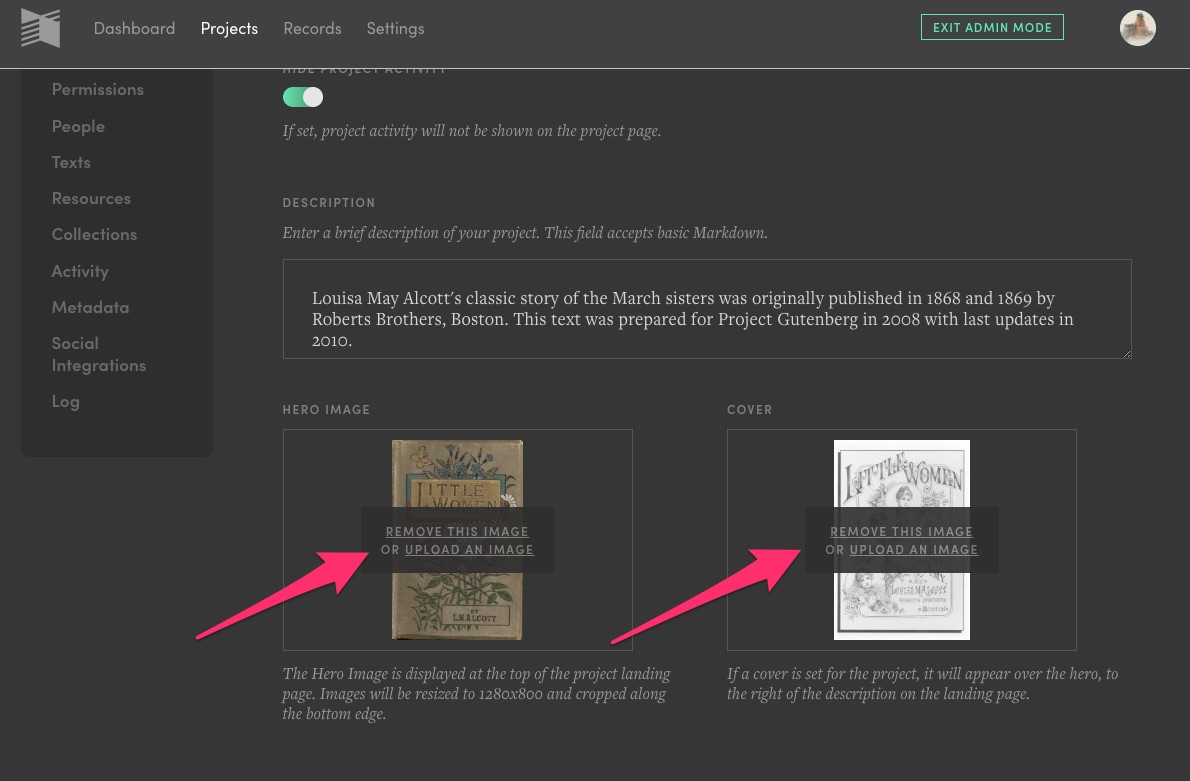
Now you get to determine what will lure people to your book. Design your own cover, add your own image,s or find images online (labelled for reuse with modification). You can choose the thumbnail (on the General page), hero (the background picture), and cover (the click-on-me! icon for your project).
CONGRATULATIONS!
You’ve officially published your first Manifold Edition!
Step 6: Ingest a Manifest for Google Docs
When working on a group project -- edited chapters, assorted course materials, collected works, etc -- sometimes it’s easiest to use a smattering of files. This makes for easy delegation of tasks. We do recommend that you choose your file structuring in advance so that each chapter looks the same when they come together. Manifold will respond to the header classes you choose, so be sure every contributing author follows the same practices.
Manifest
A Manifest upload can be composed of a collection of one file type or a mixture of them, excepting EPUBs. Thus, it is possible to create a single Manifold text from one or more Google Docs, Markdown files, and HTML files: three different file types and sources combined to form one whole.

When the various source documents have been prepared according to the requirements of their format, users should compress (or zip) all of the documents—along with the required YAML file described below—into a single archive, which can then be uploaded into Manifold. The structure of YAML file will be represented on the reader’s contents dropdown, and its content will inform what is displayed on the title bar. See the YAML section following for details.
Prepare your YAML File
In order for Manifold to properly ingest multiple source documents at once, the system requires a YAML file to be included along with them in the compressed archive that will be loaded into the system.
In cases where there are no source documents to upload (e.g., if you are creating a text from multiple Google Docs) then only the YAML file needs to be loaded. When uploaded alone, the YAML file does not need to be compressed or zipped.
The YAML file is a means for users to tell the system how to organize the materials that are being ingested into the system and how they relate to one another.
If any of the fields require characters that are not letters, excepting source_path, enclose your input within single quotes as shown in the example below.
When creating or modifying a YAML file, be sure to use a plain text editor like Notepad (PC), Text Edit (Mac), Sublime Text (download), or Atom.io (download).
Indentations matter in YAML, so prepare your file carefully, using two spaces for each indent. The example below can be copied and pasted for easy modification.
meta:
title: 'Title for the Text: As a Whole'
language: en
rights: 'This text is licensed under a CC BY-NC-ND 4.0 license.'
description: 'This text considers a, b, and c.'
creators:
- name: Rowan Ono
- name: Max Duo
contributors:
- name: Ida Davis
- name: Danielle Idra
toc:
- label: Title of First Section
source_path: chap_1.html
start_section: true
children:
- label: Title of Second Section
source_path: chapt_1a.md
children:
- label: Title of Next Section
source_path: https://docs.google.com/document/d/1bTY_5mtv0nIGUOLxvltqmwsrruqgVNgNoT2XJv1m5JQ/edit
- label: Title of Another Section
source_path: chapt_2.html
- label: Title of One More Section
source_path: chapt_3.md
We recommend running your manifest through a YAML validator (try code beautify) before you attempt to ingest a text. YAML cares about indentations and quotation marks.
Some more information about the parts of the Manifold manifest (from our documentation):
Meta Block
- The meta block allows users to describe the text that is being created as a whole.
- The title field in the meta block will be understood by Manifold as being the title of the text as whole.
- Authors (creators) and contributors cannot be assigned to specific sections within the text being created; instead include all authors and contributors in the meta block.
- Other than creators and contributors, fields can only have one input, as shown here.
- The language abbreviation comes from the ISO 639-1 standard.
TOC Block
- The TOC block allows users to name, order, and locate the source files for the system.
- The input for the label serves as the title of the text section and will appear in both the contents dropdown in the reader as well as on the title bar.
- The source_path tells Manifold where to find the file: it’s location in the compressed archive or from a remote host. If there are no folders within the archive being compressed then the location is simply the name of the file. If the file is nested in a folder, it would be {folder-name}\{filename.extension} or, for example part1\chap_1.md.
- The start_section describes what part of the text the Manifold reader will open to. The field can only be used once and can be associated with any section. Thus a user can have the reader open to chapter 1 instead of, say, a preface.
- The children tag allows users to nest content. This nesting will also be rendered as expected on the Contents dropdown. It is important that nested content be spaced as is shown in the sample above, with each level of nesting described by an indent of two spaces). Manifold can render nesting up to three levels in the contents dropdown.
In order to be properly processed by the system, the YAML file has to be titled manifest.yml.
Document Metadata
Each source document being uploaded to Manifold can include the following metadata. When ingesting single documents all of the metadata can be included in the upload. When ingesting through the Manifest strategy, the source document should only include title metadata, with the rest included in the YAML file.
- Title
- Date
- Language
- Rights
- Description
- Creator
- Contributor
There can be multiple creators (authors) and contributors for each upload. The system will automatically attempt to match existing records of the same name. If none is found, then the system will create a new record.
Related Themes
Following are related themes that link to other pertinent sections concerning how you work with texts in the system:
- Setting a Project to Draft Mode
- Adding a Text to a Project
- Setting Published Texts
- Grouping Texts Within a Project
- Reingesting a Text
- Writing for the Web
Licensing
You do not have to set the license for your Manifold project to go live. We do, however, recommend that you set your license early so that others know how they may remix and adapt your materials.
Under Metadata in your ADMIN MODE, you’ll see a field for “Copyright.” Here you might wish to use the Creative Commons Sharealike license.
This work is licensed under the Creative Commons Attribution-ShareAlike 2.0 Generic License. To view a copy of this license, visit http://creativecommons.org/licenses/by-sa/2.0/ or send a letter to Creative Commons, PO Box 1866, Mountain View, CA 94042, USA.